Building a data center is one of the most complex infrastructure projects a business can take on. There are dozens of decisions to make, and every choice affects long-term performance and cost. That is why having a clear data center installation guide matters from the very beginning.
This guide walks you through each phase of designing and building a data center from scratch. It covers everything from site selection to cabling, power, cooling, and commissioning. Whether you are a business owner, IT manager, or facilities director, this step-by-step overview will help you understand what goes into a successful build.
Texas is one of the fastest-growing markets for data center construction in the country. If your business is planning a new facility or major upgrade, this guide gives you a solid starting point.
Why a Structured Approach to Data Center Installation Matters
Data centers are not like standard office renovations. A single design mistake can create problems that last for years. Poor cable management makes troubleshooting a nightmare. Underestimating power loads leads to outages. Choosing the wrong cooling system causes overheating and equipment failure.
A structured approach prevents these problems. It gives every team member a clear picture of what is happening, when, and in what order. It also helps keep projects on budget and on schedule.
This data center installation guide follows the same approach ITS uses with clients across Texas and nationwide. Each step builds on the one before it, so nothing is missed.
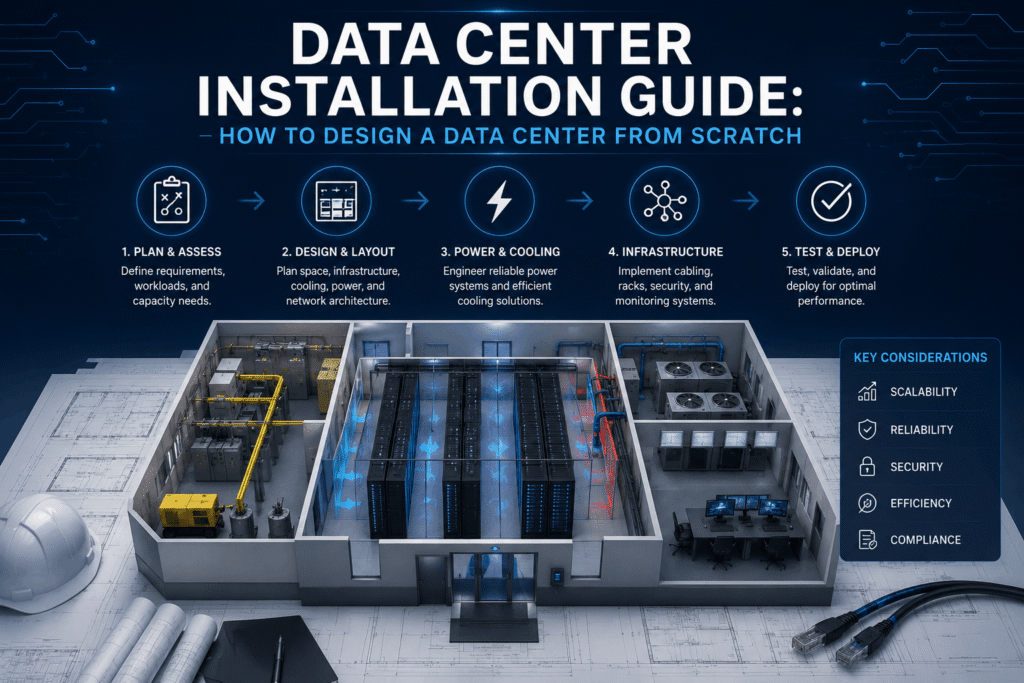
Step 1: Define Your Goals and Requirements
Every successful data center project starts with a clear set of goals. Before any plans are drawn, you need to answer some fundamental questions.
What will the data center be used for?
Some facilities are built to support a single company’s internal operations. Others are built to host servers for multiple clients. Your intended use shapes nearly every other decision in this guide.
How much capacity do you need now and in five years?
It is easy to design for your current needs. It is harder to design for growth. Underbuilding now often means expensive upgrades later. Overbuilding wastes money upfront. Work with your team to build realistic projections for the next three to five years.
What uptime standard do you need?
Data centers are classified by tiers, from Tier 1 through Tier 4. Higher tiers offer more redundancy and less downtime but cost more to build and run. Understanding which tier your business needs is a key early decision.
Here is a quick overview:
• Tier 1: Basic facility with no redundancy. Suitable for small businesses.
• Tier 2: Some redundant components. More reliable than Tier 1.
• Tier 3: Concurrently maintainable. No shutdowns needed for routine maintenance.
• Tier 4: Fault tolerant. Highest level of redundancy and uptime.
Step 2: Choose and Evaluate Your Site
Location matters more than most people expect. The site you choose affects power availability, cooling options, connectivity, and long-term operating costs.
Power Access
Data centers are heavy power users. Before committing to a location, verify what utility power is available and whether it can support your load requirements now and in the future. Check if a second power feed is possible for redundancy.
Network Connectivity
Your data center needs fast, reliable internet connections. Look for sites near fiber routes or locations where multiple carriers offer service. More carrier options give you better pricing and redundancy.
Physical Risk Factors
Evaluate the site for flood risk, seismic activity, and proximity to industrial hazards. In Texas, flooding is a real concern in some areas. Choose a location that reduces your exposure to natural and environmental risks.
Building Condition and Layout
If you are converting an existing building, have a structural engineer assess the floor load capacity. Data center equipment is heavy. Standard office floors are often not rated to handle it without reinforcement.
Step 3: Design the Physical Layout
Once your site is selected, it is time to design the floor plan. This is where the physical shape of your data center comes together.
Hot Aisle and Cold Aisle Layout
Most modern data centers use a hot aisle and cold aisle layout. Servers face cold air in the cold aisle and exhaust hot air into the hot aisle. This separation makes cooling much more efficient and reduces energy costs.
Rack Layout and Density
Plan where server racks will be placed. Consider how many racks you need now and how many you might add in the future. Leave space between rows for access and airflow. Higher rack density means more heat per square foot, which affects your cooling design.
MDF and IDF Placement
Your main distribution frame (MDF) is the central hub for all cabling. Intermediate distribution frames (IDFs) connect back to the MDF and serve specific sections of the facility. Placing these correctly reduces cable runs and improves network performance.
BIM Modeling for Precision Planning
Building Information Modeling (BIM) lets designers create a digital version of the data center before construction begins. This helps catch conflicts early, like a cable path that runs too close to a power conduit. ITS uses BIM modeling as part of our data center installation process to improve accuracy and reduce costly rework.
Step 4: Plan Your Power Infrastructure
Power is the lifeblood of any data center. Without a reliable and well-designed power system, nothing else matters. This phase of the data center installation guide covers the main power components you need to plan for.
Uninterruptible Power Supply (UPS)
A UPS system keeps your equipment running during a power interruption. It provides short-term backup while generators start up. Size your UPS for your current load plus room for growth. Most data centers use modular UPS systems that can be expanded over time.
Generators
Generators provide long-term backup power during extended outages. Diesel generators are the most common choice. Make sure your fuel supply plan can support extended operation, especially during severe weather events in Texas.
Power Distribution Units (PDUs)
PDUs distribute power from your UPS to individual racks and equipment. Choose PDUs that give you visibility into power usage at the rack level. This data helps with load balancing and capacity planning.
Grounding and Bonding
Proper grounding protects equipment from electrical surges and ensures safety for personnel. Grounding must meet code requirements and industry standards. ITS handles grounding and bonding as part of every data center build to ensure compliance and safety.
Step 5: Design Your Cooling System
Cooling is often underestimated in data center planning. Server equipment generates enormous heat. Without proper cooling, equipment fails and downtime follows. Your cooling design should match your power density and layout.
Computer Room Air Conditioners (CRACs) and Air Handlers (CRAHs)
These units are the workhorses of most data center cooling systems. CRACs use refrigerant-based systems. CRAHs use chilled water. Both can be placed at the perimeter of the room or between rows for higher-density cooling.
Hot Aisle Containment
Containing the hot aisle prevents hot exhaust air from mixing with cold supply air. This improves cooling efficiency and reduces energy use. It is one of the most cost-effective upgrades you can make to a data center cooling design.
Raised Floor vs. Overhead Cooling
Raised floors allow cold air to flow up through floor tiles directly in front of equipment. Overhead systems deliver cold air from above. Each has advantages depending on your rack density and layout. Many newer facilities use a combination of both.
Step 6: Plan and Install Your Cabling Infrastructure
Cabling is one of the most critical and detail-intensive parts of any data center build. Poor cabling creates problems that are hard and expensive to fix later. This section of the data center installation guide deserves careful attention.
Fiber Optic Backbone
The backbone connects your MDF to each IDF and carries the highest volume of traffic. Fiber optic cable is the standard choice for backbone runs because it handles high speeds over long distances. ITS offers full fiber optic installation services for data center builds across Texas.
Copper Horizontal Cabling
Horizontal runs connect each rack to the nearest IDF. Cat6A copper cable is the recommended standard for most data centers in 2026. It supports 10 Gbps speeds over full 100-meter runs. Our copper cabling solutions are installed and certified to meet ANSI/TIA standards.
Cable Management
Every cable in a data center should be routed through trays, ladders, or conduits. Cables should be labeled at both ends. Patch panels should be organized by zone or function. Clean cable management makes maintenance faster and reduces the risk of accidental disconnections.
Structured Cabling Standards
All cabling in a data center should follow ANSI/TIA-942 standards for data center cabling infrastructure. This ensures compatibility, performance, and compliance. The Telecommunications Industry Association publishes these standards and updates them regularly. Learn more about how structured cabling fits into your overall network in our guide to structured network cabling.
Step 7: Set Up Network and Connectivity
Once your physical cabling is in place, the next phase focuses on your network equipment and connectivity setup.
Core and Edge Switches
Core switches handle the highest volumes of traffic in your data center. Edge switches connect to servers and storage devices at the rack level. Choose switches that support the speeds your infrastructure requires, and always build in redundant paths.
Firewall and Security Appliances
Network security hardware protects your data center from external threats. Position firewalls at the network perimeter and between internal zones. Physical access controls should also be layered into the security design.
Out-of-Band Management
Out-of-band management lets your team access network equipment remotely, even when the main network is down. This is a critical tool for troubleshooting and reduces the need for on-site visits during off-hours incidents.
Step 8: Install Physical Security Systems
Physical security is just as important as network security. Unauthorized access to your data center is a serious risk. Every layer of access should require authentication.
A complete data center security plan typically includes:
• Card reader or biometric access control at each entry point
• Security cameras covering all aisles, entrances, and exits
• Motion sensors in sensitive areas
• Video storage with at least 30 days of footage retention
• Mantrap or airlock entry systems for high-security areas
ITS provides full commercial security system installation that integrates seamlessly with your network and cabling infrastructure.
Step 9: Install Environmental Monitoring
Environmental conditions inside your data center can change quickly. Heat spikes, humidity swings, and water leaks can damage equipment or cause outages. Monitoring systems give you real-time visibility into conditions throughout the facility.
Key environmental sensors to install include:
• Temperature sensors: Placed at the front and rear of racks to track hot and cold air.
• Humidity sensors: Too much or too little humidity can damage hardware.
• Water leak detection: Rope-style sensors placed under raised floors and near cooling units catch leaks early.
• Airflow sensors: Monitor whether cold air is reaching equipment as designed.
All sensor data should feed into a central dashboard that your team can access at any time. Set up automated alerts so staff are notified immediately when any reading goes outside normal range.
Step 10: Test, Commission, and Document Everything
Before going live, every system in your data center needs to be tested. This phase is often rushed, but it is one of the most important parts of this data center installation guide.
Cable Testing and Certification
Every copper and fiber cable run must be tested to verify it meets performance standards. Use certified testing equipment and document results for every run. Cable certification protects your warranty and gives you proof of performance.
Power and UPS Testing
Test your UPS and generator systems under load before go-live. Simulate a power outage to confirm that backup systems kick in properly and within acceptable time limits. Document all test results.
Cooling Verification
Run your cooling systems and verify that temperature targets are being met throughout the facility. Use thermal imaging if needed to spot hot spots. Adjust airflow before equipment is loaded into the racks.
As-Built Documentation
As-built documentation captures the final state of everything that was installed. This includes cable labels, port maps, network diagrams, power schedules, and equipment inventories. This documentation is essential for managing the facility over time and for any future upgrades.
Common Mistakes to Avoid in Data Center Design
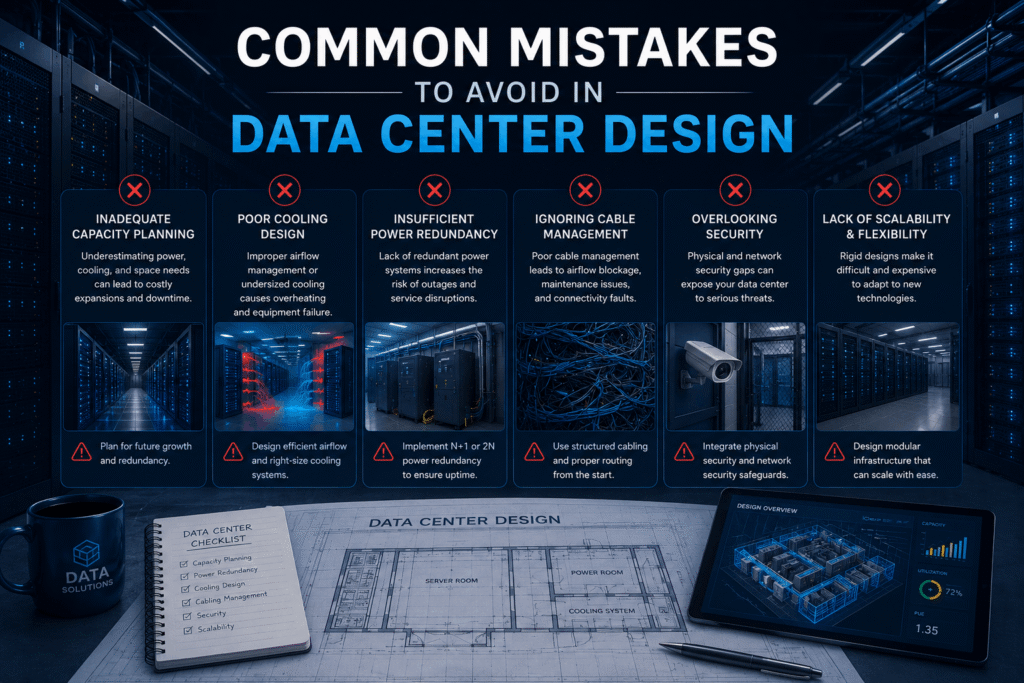
Even experienced teams make mistakes during data center builds. Here are the most common ones and how to avoid them.
• Underestimating power density: Plan for higher rack densities than you think you need. Technology keeps getting more powerful.
• Skipping redundancy to save money: Single points of failure will eventually cause downtime. Redundancy is an investment, not an expense.
• Poor cable management from day one: It is far easier to do this right the first time than to reorganize it later.
• Not testing before go-live: Skipping commissioning tests is a risk not worth taking.
• Choosing the wrong cabling installer: Inexperienced installers create problems that certified teams have to fix later at much greater cost.
• Not planning for growth: Build room into your design so expansion does not require a complete rebuild.
Start Your Data Center Project With ITS
This data center installation guide covers the core phases of designing and building a facility from scratch. But a guide alone does not build a data center. That takes an experienced team with the right tools, certifications, and attention to detail.
Integrated Technology Solutions has supported data center builds for clients across Texas and the United States. From site planning and BIM modeling to structured cabling, fiber optic backbone, grounding, and security integration, we handle every phase under one roof.
Our BICSI-certified technicians follow ANSI/TIA standards on every project. We also offer managed wireless and network services to keep your facility connected and performing after the build is complete. Review our full range of technology infrastructure services to see everything we offer.
Contact Integrated Technology Solutions today to discuss your data center installation project. Call us at +1 888-985-5334 or visit our contact page to schedule a consultation with our team.
Frequently Asked Questions About Data Center Installation
How long does it take to build a data center from scratch?
Timelines vary by size and complexity. A small data center room may take a few weeks. A large enterprise facility can take six to eighteen months. Planning and permitting often take as long as construction itself.
What is the most expensive part of a data center build?
Power and cooling infrastructure typically represent the largest share of construction costs. The more redundancy you build in, the higher those costs go. Cabling and network equipment are also significant line items.
Do I need a BICSI-certified installer for my data center?
Yes. BICSI certification means your installer has demonstrated professional knowledge of low-voltage cabling systems. It also protects you, since certified installers follow recognized standards. Many equipment warranties require certified installation.
What cabling standard should I use for my data center?
Every successful data center project starts with a clear set of goals. Before any plans are drawn, you need to answer some fundamental questions.
What will the data center be used for?
Some facilities are built to support a single company’s internal operations. Others are built to host servers for multiple clients. Your intended use shapes nearly every other decision in this guide.
How much capacity do you need now and in five years?
It is easy to design for your current needs. It is harder to design for growth. Underbuilding now often means expensive upgrades later. Overbuilding wastes money upfront. Work with your team to build realistic projections for the next three to five years.
What uptime standard do you need?
Data centers are classified by tiers, from Tier 1 through Tier 4. Higher tiers offer more redundancy and less downtime but cost more to build and run. Understanding which tier your business needs is a key early decision.
Here is a quick overview:
Tier 1: Basic facility with no redundancy. Suitable for small businesses.
Tier 2: Some redundant components. More reliable than Tier 1.
Tier 3: Concurrently maintainable. No shutdowns needed for routine maintenance.
Tier 4: Fault tolerant. Highest level of redundancy and uptime.
